Providing printscreens or screen captures is probably one of the easiest way to discuss, understand and deliver any information over the Internet. Major operating systems like Windows and MacOSX comes with default keyboard shortcuts to perform screen capturing, but are you using them to the fullest?
Looking for more keyboard shortcuts? Here’s some you might be interested:
- Keyboard shortcut for Photoshop CS2 Toolsbox
- 100 Windows Keyboard shortcuts
- 80 Keyboard shortcuts for Microsoft Outlook
Full content after jump.
Windows Printscreen Keyboard Shortcuts
By default, there isnt too much option in doing screen capture but enough to get the basic job done. Here are the keyboard shortcuts to do screen capture (printscreen) in Windows.
- PrtScn – The Print Screen button will save the entire screen in clipboard. You will then need to further edit it in some image editing programs or Microsoft Words.
- Alt + PrnScn – By holding Alt key while pressing PrtScn button, it captures only the active window. That means the window screen currently in view.
Vista
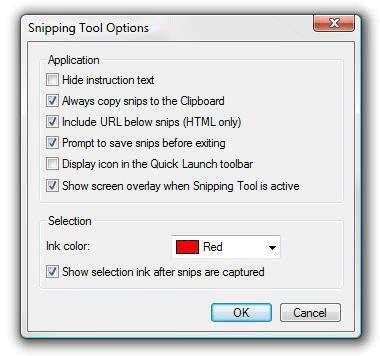
Together with Windows Vista, an utility call Snipping Tool was introduced. It gives much more flexibility for screen capturing. Learn how to use Sniping Tool.
Mac Printscreen Keyboard Shortcuts
Mac OSX covers more different ways to do screen capturing. It allows you to print screen active/non-active windows, full screen and selective area.
The following screen capture shortcuts print and output images on desktop in the format of .PNG (Portable Network Graphics)
- Command + Shift + 3 – Prints the entire screen, everything inside your monitor screen.
- Command + Shift + 4 – Prints the screen according to user selection. By using the following shortcut, your cursor will turned into a cross-hair and allows you to select the area you want to capture.
- Command + Shift + 4 then Space – By holding down Command + Shift + 4, your cursor will turn to cross-hair. Then hit the space bar once it will turned to a camera icon. This allows you to capture any opened windows, regardless of active or hiding behind.
If you want your screen capture to be kept in clipboard so you can paste them in image editing tools (eg. Photoshop) instead of output as .PNG, just include Control while using the shortcut.
- Control + Command + Shift + 3 – Captures entire screen, hold image in clipboard.
- Control + Command + Shift + 4 – Captures screen according to user selection, hold image in clipboard.
Changing output File format
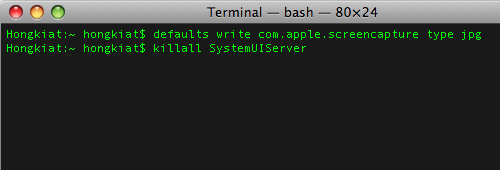
By default, Mac outputs screen captures in .PNG (Portable Network Graphics) format if you did not include ‘Control’. If you prefer JPG, GIF, TIFF over the default .PNG, here’ how you can it manually. Launch Mac’s Terminal and insert these 2 commands.
defaults write com.apple.screencapture type jpg
killall SystemUIServer
The above commands change your output to .JPG. Simply change that to any format you want. Remember to include the second command killall SystemUIServer that basically does the restarting to make sure your changes will work.
No related posts.


